Upgrade NVMe SSD in MacBook Air: Complete Guide and Performance Results
Published: August 7, 2026
Introduction
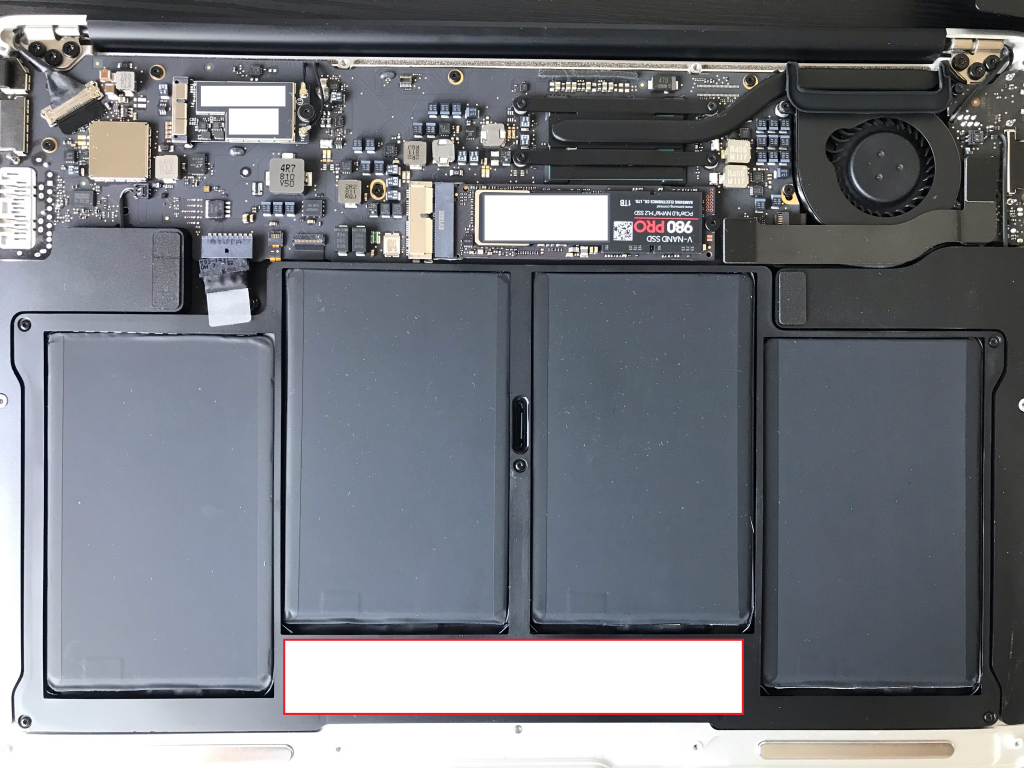
The MacBook Air 2017 remains a reliable and capable laptop, but its original Apple SSD can become a limitation, especially when additional storage capacity is required. Fortunately, this model supports upgrading to a third-party NVMe SSD using a compatible adapter.
In this guide, I will walk through the replacement process, explain the hardware requirements, and share real-world performance results after upgrading from the original Apple SSD to modern NVMe drives.
Why Upgrade to an NVMe SSD?
NVMe (Non-Volatile Memory Express) is a storage protocol designed specifically for PCIe-based solid-state drives. Compared to older SATA SSDs, NVMe drives provide:
* Higher read and write speeds
* Lower latency
* Improved responsiveness
* Better performance for development tools, virtual machines, and large file transfers
* Significantly larger storage options at a reasonable price
For MacBook Air models produced up to 2017, an NVMe upgrade is one of the most effective ways to extend the lifespan of the device.
Compatibility
Before purchasing an SSD, verify that your MacBook Air supports NVMe upgrades.
Compatible models include:
* MacBook Air 2013
* MacBook Air 2014
* MacBook Air 2015
* MacBook Air 2017
To complete the upgrade, you will need:
* A compatible NVMe SSD
* An Apple-to-NVMe adapter
* P5 Pentalobe screwdriver
* T5 Torx screwdriver
* External enclosure or adapter for cloning data (optional but recommended)
Step 1: Power Off the MacBook Air
Shut down the MacBook Air completely and place it upside down on a clean, soft surface to avoid scratching the aluminum enclosure.
Step 2: Remove the Bottom Cover
Using a P5 Pentalobe screwdriver, remove the ten screws securing the lower case:
2 × 9 mm screws
8 × 2.6 mm screws
Carefully lift the bottom cover and set it aside.
Step 3: Remove the Original SSD
Locate the SSD module on the logic board.
Remove the single T5 Torx retaining screw.
Gently slide the Apple SSD out of its connector.
Store the original drive in a safe place.
Step 4: Install the NVMe SSD
Insert the NVMe adapter into the MacBook Air SSD connector.
Install the NVMe drive into the adapter.
Verify that the SSD is seated correctly.
Reinstall the retaining screw.
Once the SSD is secured, reattach the bottom cover.
Step 5: Install macOS or Restore Your Data
You now have several options:
Perform a clean macOS installation
Restore from a Time Machine backup
Clone your previous SSD to the new drive before installation
Disk Utility can be used to format the new SSD as APFS prior to restoring macOS.
Performance Results
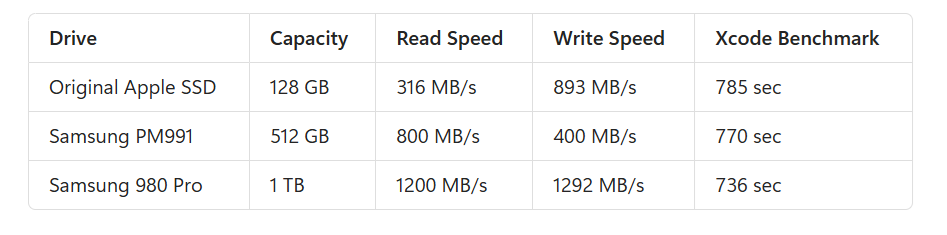
The following benchmark compares several drives tested in a MacBook Air 2017.
Observations
The Samsung 980 Pro delivered the best overall performance during testing. While the MacBook Air 2017 cannot fully utilize the drive’s maximum PCIe bandwidth, the upgrade still provides a noticeable improvement in everyday usage, application launches, software development workloads, and file operations.
Power Management Notes
Some users choose to disable hibernation and TRIM after installing certain NVMe drives to avoid compatibility issues.
Commands commonly used are:
sudo pmset -a hibernatemode 0
sudo trimforce disable
However, these settings may affect battery behavior and storage longevity. Test carefully and use only if required for your specific SSD model.
Conclusion
Upgrading a MacBook Air 2017 with a modern NVMe SSD is a cost-effective way to increase storage capacity and improve overall system responsiveness. With the right adapter and a compatible SSD, the upgrade is straightforward and can significantly extend the useful life of the machine.
For users still relying on the original Apple SSD, this remains one of the most worthwhile hardware upgrades available for the platform.